
Best Practices for Adding Exterior Insulation to Your Home
As anyone that lives in Edmonton can tell you, we have to deal with extreme temperatures all year round. We’ll get lows around -40C overnight in the winter months, and highs approaching +40C in summertime. For those of us that live in older, poorly insulated homes, that can mean overworked furnaces and AC units, massive utility bills, and uncomfortable living spaces.
That’s why so many homeowners in Edmonton are choosing to include a layer of rigid insulation underneath their new siding. It’s a cost effective upgrade that will save you money every month (and help the environment too). But even though it might seem simple to add a layer of insulation to a siding renovation, there are a few important details that can cause serious problems for inexperienced installers.
(Please note: these best practices are specific to typical single family renovation projects. Some of this information will not be applicable to new home construction, net-zero retrofits, or other specialty projects)
It’s all about the paper: Getting the WRB details right
Tyvek gets installed first, insulation goes on top
One of the most critical parts of any new siding project is the installation of the water resistive barrier (WRB). But where does the WRB get installed in an insulation assembly?
The best practice is to install the WRB directly to the sheathing, and the insulation on top of the WRB. Installing the WRB directly to the sheathing allows for the best possible moisture seal around windows, doors, and other penetrations.
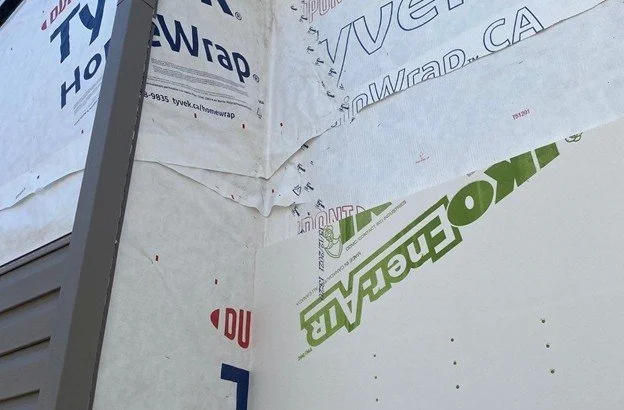
Tyvek DrainWrap is the recommended WRB to use under any panelized product, including rigid insulation. This photo clearly shows the difference between DrainWrap on the main walls of the home and the HomeWrap on the chimney chase.
Make sure to use the right Tyvek product
Blue Jay Exterior Renovations uses Tyvek HomeWrap as our WRB product of choice for standard siding replacement project. There are cheaper products out there that could save us quite a lot of money, Under insulation panels, however, HomeWrap is not the ideal choice.
Instead, Tyvek recommends that we use their DrainWrap product. When installed correctly, DrainWrap’s crinkled surface creates small vertical drainage channels. These channels allow any moisture that makes its way behind the insulation layer (for example: from condensation, or from a failed window unit) to drain out the bottom of the wall assembly, rather than being trapped against the backside of the insulation panel.
Properly fastening your siding

A homeowner called us to repair the vinyl siding on this home that was installed over a thick layer of insulation by a different company. We found out that the original installers had run out of 3” long nails by the time they had finished the main floor walls, so they finished off the gables with 2” nails.
Maximum insulation allowed under vinyl and James Hardie siding
There are specific rules for both James Hardie siding and vinyl siding for how much insulation can be installed underneath the siding layer.
James Hardie Siding: A maximum of 1” of insulation may be installed
Vinyl Siding: A maximum of 1.5” of insulation may be installed
When installing a continuous insulation layer under the siding, remember that 1.25” of embedment into structural wood for the siding fasteners is still necessary! Usually this means increasing the length of the fastener at the same rate as the thickness of the insulation. (Example: the standard Hardie nail is two inches long. If installing over 1” exterior foam, the fastener length should be increased to 3”.)
If your contractor forgets to use a longer nail (or just cheaps out and doesn’t buy the right nail) your beautiful new siding could be sagging within a few years.
Installing wood strapping for thicker insulation assemblies
If you are looking for a major R-value boost and want to move to thicker layers of insulation, your contractor will first have to install a layer of wood strapping. The strapping must be attached to the framing of the home with structural fasteners spaced appropriately. This is a very important step, as the full load of your exterior siding will rest on this layer of lumber and the screws holding it to the wall.
We recommend pressure treated 1x4 lumber as the best choice for strapping. Anything smaller will be more likely to split during the installation. In some cases, 5/4 deck boards or 2X lumber will be a more appropriate solution.
Make sure that your contractor uses the right choice of strapping materials, the structural fastener to attach the strapping to the studs, and the spacing of the structural fasteners.
Detailing for a deeper wall assembly
Windows and doors
In a perfect world, homeowners interested in an insulation layer under their siding would have their windows and doors replaced, and built out enough to allow for a perfect siding install. In reality, there are many cases where the client comes to us asking for an insulation layer that will extend well past the window frames.
In these cases, we use custom aluminum cladding and drip cap flashing to make sure that no insulation or strapping is left visible, and any moisture is directed safely onto the surface of the siding rather than into the wall assembly.
Lights and electrical outlets
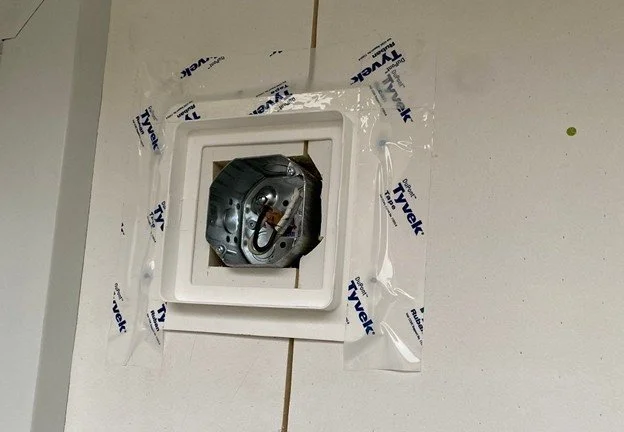
Electrical fixtures must be properly detailed for a code compliant installation.
We never know exactly what we will find when we take down the old lights and plugs prior to installing our water resistive barrier. One thing that is always true is that we need a qualified person to prepare the light and plug receptacles for re-installation after building out with foam.
One of the reasons that many contractors fail to account for building out the electrical fixtures? They don’t intend to re-install your lights and plugs at all! They’ll pack up and drive away, leaving you to deal with all the finishing touches. Obviously this isn’t right, and isn’t how we treat our customers.
Intake and exhaust vents

Steel gooseneck exhaust vent installed on top of insulation layer for best moisture management.
What happens to a small dryer vent when a lazy contractor installs 1.5” of insulation and vinyl siding? Almost the entire mouth of the vent gets blocked! This pushes warm, moist air (and dryer lint) behind the siding and insulation. This can lead to rot damage, strain on your appliances, and just looks plain bad.
Blue Jay always replaces broken and incompatible exhaust and intake vents as part of our process, but it’s even more important on exterior insulation projects! Make sure that your contractor has a plan to properly deal with your exhaust and intake vents.
Fence posts, Hose bibs, downspouts, and other attachments
Many homeowners don’t realize just how many details will be affected by a major change in the depth of the wall assembly. Downspouts, power meter masts, natural gas lines, sunrooms, and the list goes on. Even your house numbers and mailbox might not work without a little bit of planning!
A contractor who is experienced with siding/insulation projects should be able to look at these areas and let you know what the plan will be. If they don’t have a plan, it likely means it will be up to the installer to “figure it out” the best that they can from whatever materials happen to be lying around. This is NOT a recipe for a good looking installation.
Vinyl siding and insulation attachments done wrong!

Here’s an example of what it can look like when your contractor doesn’t focus on the details. Notice the vent almost completely covered by siding and insulation? What might have been a better detail for the hose bib that is barely sticking out past the siding?
Use the right insulation products!
It may seem like common sense, but it is absolutely crucial to use the right insulation products for your project. Many rigid insulation products are manufactured to be installed in areas other than exterior walls. Flat roofing, foundation walls, floor slabs, and cathedral style ceilings are just a few examples of areas that typically receive rigid insulation, but behave very differently than the exterior of an insulated 2x4 wall!
The fact is, very few siding contractors have any kind of experience with building science. This leads them to use whatever insulation panels they can get for a good price, with no thought to the performance of the whole wall assembly - and it’s the homeowner that will eventually pay the price.
Foil faced insulation with taped seams: a major mistake
Every time we drive by a project where the siding contractor or homeowner is installing foil-faced insulation with taped seams in the panels, we cringe. Foil and plastic faced insulation products are completely impermeable to moisture vapour, and won’t allow your walls to dry if any moisture gets into the wall assembly. If you also have a vapour barrier on the interior of your walls, the wall also won’t be able to dry inwards. This means the moisture will be trapped inside the wall, and the wood will quickly rot.
To make matters worse, most installers that tape the seams of their insulation panels are choosing to use the surface of the insulation itself as their water resistive barrier. This means that they might not have installed any Tyvek at all, and the odds are good that some moisture will leak into the wall at some point.
Exterior insulation: simple, but not “dummy proof”
The bottom line is that as long as you or your contractor can plan ahead, select the right products, and follow the guidelines in this article, adding a layer of exterior insulation to your home can be a great investment. If you have any questions or you’d like us to prepare a quote for your project, click the button below to reach out for a quote!