
7 Blue Jay Advantages in One Picture
It can be tough to truly understand the subtle differences between contractors on a siding renovation project. We always try to make our quotes as clear and detailed as possible, but we also understand that there’s a limit to how much information we can include in a quote before the customer’s eyes will start to glaze over.
That’s why I took this picture when I stopped by for a routine daily site check. As I was inspecting the work, it occurred to me that I was looking at several concrete examples of a high-quality installation that exceeds market standards, and would definitely blow away our competition.
Well, they say a picture is worth a thousand words. Here’s one picture that shows several key points that make a Blue Jay siding renovation better than the rest:
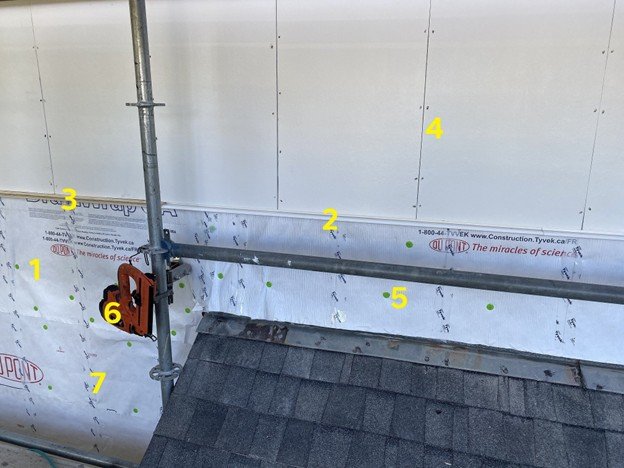
Note: These 7 items are unique, and don’t appear on every project that we work on. Because every renovation is different, each house will have its own details to consider and problems to solve.
1. Drainable house-wrap
For this project, a part of the exterior featured custom coloured HardiePanels with vertical trim boards. Over the last several years, there have been a number of changes to James Hardie’s requirements for wall drainage under HardiePanel vertical siding.
While Hardie does not require contractors to install any kind of drainage plane for single family projects, we believe that drainage behind full sheets of panels is important, so we always install Tyvek DrainWrap as the house wrap behind HardiePanel.
DrainWrap is essentially the same material as Tyvek HomeWrap, but with one key difference. DrainWrap is crinkled, which creates small vertical channels for any moisture that collects to drain through. The reduces the amount of moisture that can get trapped between the house wrap and the back of the siding.
2. Colour matched flashing
The HardiePanels on this exterior were a custom colour (Farmhouse White) from the James Hardie Dream Collection. Farmhouse White is a warm shade of off-white, and standard Polar White flashing would not have been a good match at all. We found two better alternatives and let our customer decide which was the best fit for the exterior.
Using colour coordinated flashing might seem like a no-brainer, but I promise you there are plenty of contractors in Edmonton that wouldn’t even think of it. Most of the siding suppliers in town only carry flashing in white or black, because most new windows will be one of those two colours. This means that using a different colour means a specific trip to one of the two places where coloured flashing is available. It’s a small thing that just takes a bit of effort, but it makes a huge difference.
3. Drainage gap
James Hardie requires a minimum gap of one-quarter inch (1/4”) between the bottom of their siding or panels and a drip flashing to promote proper drainage. If the panel in this picture were sitting right on the flashing, any water that drained down the wall and onto the flashing would get trapped behind the panels. This would eventually cause the panels to show moisture damage, such as paint flaking and panel delamination.
Many contractors installing HardiePanel set the panels right on top of the flashing, or skip the flashing altogether! Here, we used a plywood spacer to make sure that we consistently maintained the appropriate gap.
4. stainless-steel siding nails
James Hardie siding is warranted for 30 years (and should last even longer with proper installation). Unfortunately, almost all contractors install Hardie with cheap bulk nails with little to no quality testing. Our Hardie nails are made from stainless-steel, feature a ringed shank, and are tested in accordance with ASTM and ICC standards.
We pay 7 times more for our Hardie nails than the market standard, but it’s an area where we refuse to compromise.
5. cap staples
Did you know that almost every siding contractor ignores best practices when installing Tyvek? The manufacturer recommends using cap staples when installing Tyvek, but because of the extra cost and effort, nobody bothers.
We use cap staples with Tyvek for two main reasons: 1) the caps provide much better holding power, which keeps the paper from flapping around in the wind and falling off the wall, and 2) the caps seal around the staple, which reduces the amount of moisture penetration through the Tyvek and onto the sheathing.
6. Cordless finish nailer
When we used to work as James Hardie product reps, we used to hear tons of complaints about smooth HardieTrim. One of the most warranted ones is that it is extremely difficult to face-nail HardieTrim with a 16-gauge finish nail, and end up with an aesthetically pleasing result. The reason is that air-powered finish nails are extremely finicky when firing through HardieTrim, which often leads to over driven nails that leave craters in the face of the smooth trim.
For most of our HardieTrim installations, we use HardieTrim tabs for concealed fastening; trim tabs reduce the amount of face nailing on a project by about 90%. But with a board and batten installation, trim tabs won’t work. Luckily, we also have cordless finish nailers to go along with the air powered ones. Cordless guns always strike with the same amount of force, which takes away one of the two variables that causes unpredictable nail depth.
The result still isn’t always perfect, but using a cordless finish nailer does make a huge difference in reducing the number of countersunk nails in HardieTrim.
7. Sheathing nails
The original exterior of this home was a mix of wood siding and stucco (which contained asbestos). Once the stucco was removed, it became obvious that the original home builder had used the stucco mesh fasteners to double as the plywood sheathing fasteners. This meant that the plywood panels were held on with only a few nails here and there.
The issue with that is that the customer had a particular design in mind, with battens installed every 21” on center. This meant that all of our fastening would have to be done off stud. What happens if you install 100-pound HardiePanels off studs without structurally secured sheathing? It could all tear away from the wall: siding, Tyvek, and plywood together.
Once we noticed the missing sheathing fasteners, we set about securing the plywood to the studs with ring shank sheathing nails. This was the first time that we’ve ever dealt with plywood that wasn’t secured to the studs, but if another contractor had completed this project, the results could have been very different.
Each one of these items is an example of a situation where a contractor has a choice: do it properly, or cut a corner. Cutting corners is not something that most contractors actively try to do. Rather, it’s usually the result of a lack of knowledge, a lack of project management, or simply a lack of caring.
Doing the job properly requires the exact opposite: experience, quality control, and a high level of caring.